This document describes how to use AirTurn remotes for controlling prompter features.
Requirements: The AirTurn device must be paired with the iOS device. Follow the AirTurn instructions to pair the devices. Ensure that the AirTurn device is configured for use with an iPad. Follow the AirTurn instructions for selecting the correct mode. |
1. Open the settings by pressing the settings button.
![]()
2. Select the Remote option.
![]()
3. Select the AirTurn Remote option.

4. Enable the switch for AirTurn Support.
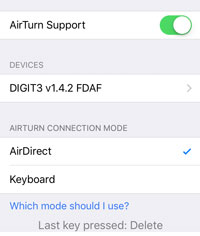
5. Select the correct connection mode for the AirTurn device you are using. Press the Which mode should I use? link to display a list of AirTurn devices. Selecting a device from the list will automatically choose the correct connection mode.
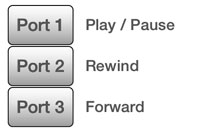
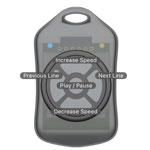
6. Choose how to display the AirTurn device by pressing the Show as: Ports, Digit II, Digit III, and PED option. This does not change how the AirTurn device functions, but is included to assist in configuring the ports as they map to physical buttons.
![]()
![]()
![]()
![]()
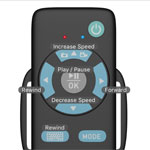
7. To change a function for a button/pedal/port, press the button on the remote graphic or the button with the port number to change.
Note: Pressing a pedal, or button on the physical remote will illuminate the cooresponding button or pedal on the graphic.

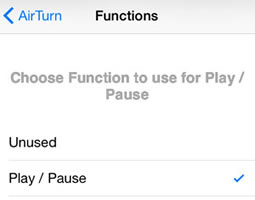
8. Select the function for the control from the list of prompter functions.
9. When finished configuring, close the settings by pressing the settings button.
![]()
10. Use the controls on the AirTurn remote to control prompter functions.
Trouble Shooting AirTurn Devices
1. Ensure that your AirTurn device is connected using the BlueTooth settings. To do this, following the instructions that came with your device.
2. Ensure that your AirTurn device is in the correct mode for iOS devices. Follow the instructions that came with your device.
3. Ensure that your AirTurn device is sending keystrokes to the iOS device and that those keys are being received by the iOS device. You can use Notepad (or any app that allows you to enter multiple lines of text) and do the following experiment: